Maximizing Storage Efficiency: Configuring TrueNAS inside Proxmox
Configuring our storage drives in TrueNAS for our Home Lab!

In the previous article, we covered the step-by-step instructions about the TrueNAS installation as a VM inside the proxmox environment in our Home Lab and have also installed the same. We also had an introduction to TrueNAS on what exactly it is.
Now in this article, let us look into configuring our storage drives within our TrueNAS installation so that we’ll be able to store and access our files easily without any hassle.
Generally, when we use a desktop or a laptop, all the data in the system is stored on the hard drives of the system we use. In a similar way, we need hard drives to be installed in our Home Lab, so that we would be able to store and access the data using the hard drive.
Let us quickly grab the available hard drives we have at our disposal and connect them to our Home Lab system in which we are running our Proxmox environment. Before connecting the hard drives do remember to shut down the system before proceeding to remove the Chasis or back cover of the system.
Connect the appropriate cables from the hard disk to the motherboard and the PSU. Once done, close the chassis or the back cover and turn on the machine. Give a minute for the system to turn on fully. Once our Home Lab is up, hop back into the proxmox login and let us look into adding the connected hard disks to TrueNAS. Do not turn on the TrueNAS VM yet.
Note: The hard disks can be connected to a HBA instead of directly connecting to the motherboard. The HBA can be passed directly to TrueNAS as well to access the drives
Adding Hard Disks to TrueNAS:
In order to pass the connected hard drives to TrueNAS, we first need to identify the Disk ID of the hard drives. We will be passing the hard drives based on their Disk ID instead of their mount directory. The reason behind it is that each time proxmox gets restarted, the mount directory of the drives connected would change. As a result, if we pass the hard drives to TrueNAS based on the mount directory then we would incur data loss since the current mount directory would point to a different drive.
- After logging in to proxmox, click on the server and then on the shell option. In the shell, now type in the below command. The command lists out all the connected hard disks along with their mount points and their Disk ID.
lsblk |awk 'NR==1{print $0" DEVICE-ID(S)"}NR>1{dev=$1;printf $0" ";system("find /dev/disk/by-id -lname \"*"dev"\" -printf \" %p\"");print "";}'|grep -v -E 'part|lvm'
- Now copy the full mount point with the ID from the output in the shell which would be something like “/dev/disk/by-id/ata-HGST_HTS541010A7E630_S00001SSHABUBF”.
- We now need to add this hard drive to the TrueNAS VM so that we will be able to use it.

- On the left menu, we can see that the ID of my VM is 105. I’ll be using this ID to add the hard disk. Now by default the first hard disk would be the boot drive of the VM in which we installed the TrueNAS OS which is the ‘scsi0’ as we can see in the above image.
- Now the hard drive that we would be adding will be ‘scsi1’ since ‘scsi0’ is used already. Further hard disks if we need to add would get incremented like ‘scsi2’, ‘scsi3’, ‘scsi4’, and so on.
- We can now click back on the proxmox shell and type in the below command after populating the values with the VM ID and the Device ID that we noted earlier.
qm set 105 -scsi1 /dev/disk/by-id/ata-HGST_HTS541010A7E630_S00001SSHABUBF

# 'qm' command is used to manage virtual machines in proxmox
# 'set 105' determines in which VM we are configuring the changes
# '-scsi1' states the controller number for the drive
# '/dev/disk/by-id/ata-HGST_HTS541010A7E630_S00001SSHABUBF' states that we are passing this drive to the specified controller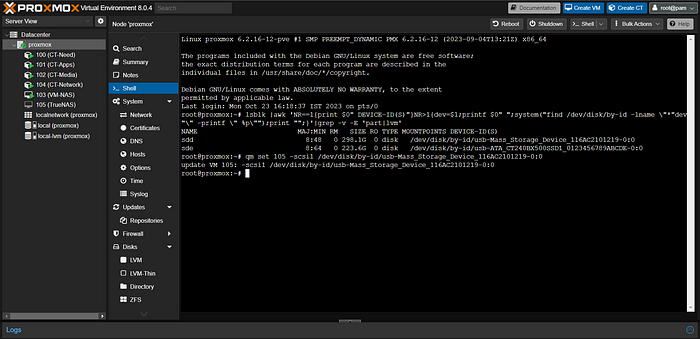
Note: Make sure to replace the VM ID and the Device ID with your own in the above command!
- We have now passed a hard drive to our TrueNAS VM. We can confirm this by clicking on the TrueNAS VM on the left menu bar and then clicking on the hardware option.

- Now we can start our TrueNAS VM by clicking on the Start button.
So far we have successfully passed the hard drives to the TrueNAS VM. We still need to create the storage pools using the drives inside TrueNAS so that we will be able to access and store our files.
Configuring Hard Disks in TrueNAS:
- Upon clicking start, head over to the TrueNAS VM and console option. The IP Address in which the TrueNAS runs will be shown in the console.

- Let us quickly open the IP in a new tab. The TrueNAS login screen will be shown. We can provide the username as ‘admin’ and the password which we set during the installation. We will be logged in successfully.
- Now we need to create a storage pool in order to make the drives usable. Let us now head over to the Storage tab in the hamburger menu.

- We can use the ‘Create Pool’ button to create a new storage pool using the drives that we have added. Now we need to provide a name for our storage pool. I’ll name it Home. We now can select the drives for our pool. Since I’ve added only 1 drive, select it and click on the right arrow near it to confirm the drive. Since I have only 1 drive I won’t be able to use any type of mirroring, parity, or RAID configuration. Upon selecting the desired configuration we can click on the ‘Create’ button.

Note: It is not advisable to create a storage pool with a stripe configuration as even if 1 drive fails then all the data in that drive would be permanently lost and there is no backup or recovery of the data.
- A pop-up shows stating that all the drive data will be deleted. We can click on the checkbox and proceed further.
- We have now successfully created a storage pool. We now need to create a dataset inside the storage pool so that users will be able to access and store the files. A dataset in simpler terms is nothing but a folder. To create a dataset, we can click on the Datasets option in the Hamburger menu. Now in the right side corner, we can see the ‘Add Dataset’ button.
- Give a name for the dataset. I’ll name it as Vault. We can leave the other options to the default. Scroll down and we can save the dataset.

- We have successfully created a storage pool and have created a dataset under the storage pool.
We have now successfully configured the hard drives inside TrueNAS. There is still one final step that we need to configure so that we’ll be able to access the drive via our network.
Creating SMB Share and Accessing the Drives:
The Server Message Block (SMB) protocol is a network file-sharing protocol that allows applications on a computer to read and write to files and request services from server programs in a computer network. In order to store and access our files from TrueNAS we need to set up an SMB share.
- We can head over to the Shares option in the Hamburger menu. We need to add an SMB share. So, we can click on the ‘Add’ button near the Windows (SMB) Shares option. Select the dataset that we just created and then we can hit the ‘Save’ button.

- It would ask to enable the service automatically. We can enable to checkbox and click on the button so that every time our TrueNAS starts, the SMB share will also start and we can access our files.
- Now we can configure the ACL (Access Control List) for the SMB share that we just created, if needed. I’ll just leave it as the default for now. Before we can access the files, we need to create a user so that we can access the files using that user
- Let us quickly click on the Credentials -> Local Users option in the Hamburger menu. Here we can click on the ‘Add’ button on the right corner to create a user. Give in a name and the password. I’ll leave all the options in the default. Scroll down and make sure the ‘Samba Authentication’ checkbox is enabled. Then only the user will be able to access the SMB share.

- We have now successfully created a user. We can now use this user to store and access our files.
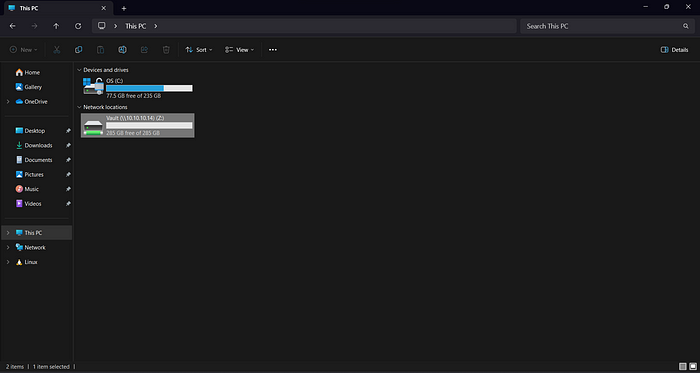
- Let us hop back to our personal computer and open ‘This PC’. Now in the navigation bar at the top, we can type the IP address of our TrueNAS.

- On hitting the Enter key on the keyboard, it would ask for a username and password. We can give the username and password of the user that we just created and hit enter once.
- Viola! We can now see the name of the SMB share that we just created. Now we can store and access the files in the folder. In order to make this folder easier to access, we can map the network drive.
- Just right-click on the folder and select the Map Network Drive option.

- We can give a drive letter and the hit enter. A new window will open with the folder. Close all the windows and open This PC again. We can now see the drive.
We can now store all our files in this drive. All the data will be stored on our Home Lab and we can access this in any system. It can be a phone, another laptop, or even another desktop. We can store and access the files as long as all the devices are on the same network. We can even create more users and set storage limits for each user. We can limit the access of users using the ACL. The applications are limitless. Just feel free to play in the TrueNAS😁
Awesome! Today we have successfully configured our hard drives and our TrueNAS. We now have an awesome and the most reliable all-in-one storage solution in our hands.
In the further articles, we will be looking into the services that I have in my Home Lab and am using regularly. We will also be covering the installation and configuration parts for those services. Stay tuned for more detailed instructions on expanding our Home Labbing capabilities.
Happy Homelabbing!!!
Originally published on: https://harish2k01.in/maximizing-storage-efficiency-configuring-truenas-inside-proxmox/
