Home Lab: Your Gateway to Tech Exploration
Spinning up your first Home Lab!

In today’s world, our day-to-day lives are being driven by Technology! The desire to learn something new always goes beyond what a typical desktop/laptop could offer. This is where the concept of “Home Lab” comes into play here.
Home Lab is nothing but a space where you can explore and experiment with your new tech without the fear of breaking your existing daily driver. One can get hands-on and work in a real environment where you are limited only by your knowledge. Starting from a simple NAS to a media server, the applications of a Home Lab are limitless.
One doesn’t need any special hardware to get started with a Home Lab. Any old desktop or laptop can play its part here. Once we are confident enough to deploy and host services we can proceed with our own set of dedicated server-grade hardware.
In this article, let us get started on installing the very first thing that we need for our Home Lab.
Getting Started:
Step 1: Downloading a Hypervisor
The first step in getting started with our Home Lab is installing a hypervisor. In simpler terms, a hypervisor is nothing but software that allows us to run multiple different mini-computers within itself. These mini-computers can be of different operating systems and can run different software without interfering with any of the other mini-computers. These mini-computers which run inside the hypervisor are called Virtual Machines. These Virtual Machines share resources like storage, memory, CPU, and RAM from the main host in which they run.
The hypervisor that we’ll be using for our Home Lab is Proxmox VE. It is one of the most commonly used hypervisor for Home Labs and is open source.
Assuming that we know about making a pen drive bootable, the first and foremost step is to download the Proxmox VE from its official website. Once the ISO file has been downloaded, we can use Rufus to make the pen drive bootable. Once done, we can plug in the pen drive to the desktop/laptop which we’ll be converting into our Home Lab, and proceed with the installation process.
Step 2: Installation
Once the pen drive is plugged into the system, we can turn on the system and enter into the BIOS. The shortcut to enter into the BIOS varies between systems. Usually, it would be F2, F10, or F12. The best way to enter into the BIOS would be spamming the above-mentioned keys multiple times when the power on button is pressed😉
Upon entering the BIOS menu, from the list of boot devices, select the bootable pen drive which contains the Proxmox VE. After selecting the device, now we can proceed with the installation process.
Note: Proxmox VE will occupy the entire selected drive which is present in the system for its installation. Unlike other operating systems like Windows/Linux, it won’t install on a partition in a drive. It takes up the entire drive and all the data would be erased. Always take a backup of the drive before proceeding with the installation.
Before proceeding make sure you have plugged in your Ethernet or any other network connection available in the system.

- Upon selecting the device, the system will start and we will be greeted with the above screen. Now, select the first option — Install Proxmox VE (Graphical) to start with the installation

- We will be prompted with the End User License Agreement. Click on the ‘I Agree’ button promptly after reading the EULA.

- Now we need to select the drive in which we would like to install the Proxmox VE and click on ‘Next’. Note: All the data on the drive would be erased and the entire selected drive would be used to store the files required to run Proxmox as mentioned earlier. Kindly make sure to take a backup of the files present in the drive before proceeding further.

- Upon clicking ‘Next’, we need to select the country, time zone, and keyboard layout that we would like to use. Again click on ‘Next’ upon selecting the same.

- Now we need to type in the password that we would like to use for the ‘root’ account and our email. Once after entered the values, click on ‘Next’.
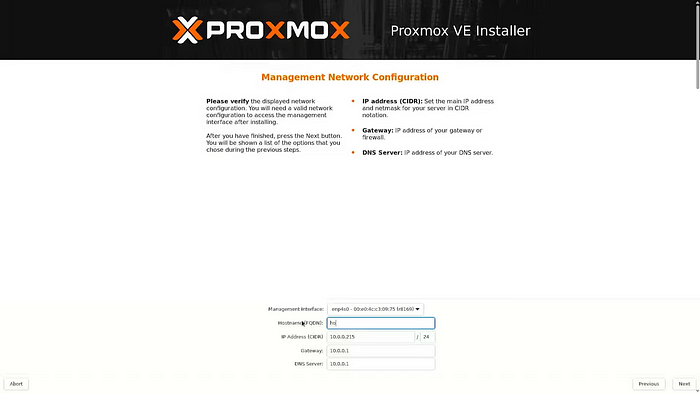
- Now we need to select the network adapter that we would like to use in our server. If only one adapter is present then select it, else select the preferred adapter.
- For the Hostname, we can give any name that we would like to use for our Home Lab. We also could specify something like “proxmox.home.lab” as the Hostname. If you have a domain, you could use it as well.
- Also, we need to fill in the IP details for our server. Usually, it would start with something like 192.168.x.x/24 depending upon your network configuration. This is the IP that we would be using to log in to Proxmox VE and configure our Home Lab.
- Upon filling in the details click on the ‘Next’ button. A confirmation screen will be shown listing the details that we have filled in earlier. We can click on the ‘Install’ button once we have confirmed the same.

- Proxmox VE will begin to be installed in our system. It would take a couple of minutes to complete its installation and the system would restart automatically in between if needed. Upon completion, the system would restart.
- After restart, the system will boot and show up a console screen. Now we have successfully installed Proxmox VE in our system and we can disconnect the keyboard, mouse, and monitor from the system as it is no longer needed. We can access our Home Lab via the IP Address which we have assigned earlier.
Step 3: Logging in to Proxmox VE
Since we have installed Proxmox successfully we can use any other system to access our server remotely using the IP address and configure it further. Open a browser in any other system. Now type in the IP address that we used earlier during installation, followed by the port number 8006. Proxmox, by default, uses the port 8006.
For Example, say we have given the IP address as 192.168.0.4 during installation, then now in the URL bar type in as http://192.168.0.4:8006 to open the Proxmox VE login remotely.
Note: The above is an example stated. Actual IP may vary depending on your input during installation and network configuration.

The above screen would open upon typing in the IP:8006. The default username given by Proxmox is ‘root’. The password is the same as that we had given during the installation process. Now type in the same and click on ‘Login’.
Hurray! We have successfully installed Proxmox and have logged in to our very own server remotely for the first time. Using this login we can configure our Home Lab based on our requirements and needs. We can create various Virtual Machines to host various services to perform different operations.
In the upcoming articles, let us dive a little deeper into how to create virtual machines and repurpose them based on our needs.
Happy Homelabbing!!!
Originally published on: https://harish2k01.in/home-lab-your-gateway-to-tech-exploration/
